
 Dean Attali
53a160d3ad
Dean Attali
53a160d3ad
|
9 years ago | |
|---|---|---|
| _includes | 9 years ago | |
| _layouts | 9 years ago | |
| assets | 9 years ago | |
| .gitignore | 9 years ago | |
| Gemfile | 9 years ago | |
| LICENSE.txt | 9 years ago | |
| README.md | 9 years ago | |
| beautiful-jekyll-theme.gemspec | 9 years ago | |
| feed.xml | 9 years ago | |
| screenshot.png | 9 years ago | |
README.md
Beautiful-Jekyll Theme (beautiful-jekyll-theme gem)
![]()
![]()
Copyright 2016 Dean Attali
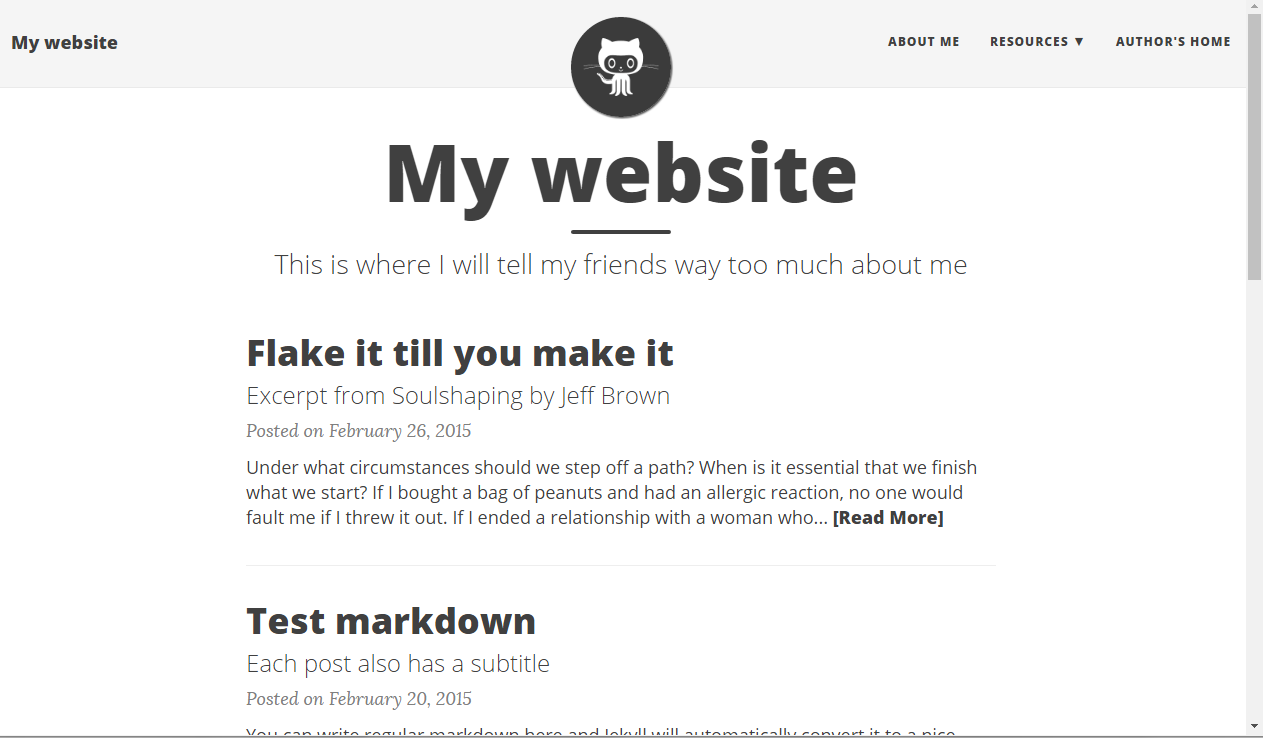
Beautiful-Jekyll is a ready-to-use Jekyll theme to help you create an awesome website quickly. Perfect for personal blogs or simple project websites, with a focus on responsive and clean design. You can look at my personal website to see it in use, or see examples of websites other people created using this theme here.
This theme was developed for non-commerical purposes. For commerical usage, or if you enjoy this theme, please consider supporting me for the development and continuous maintenance of this template.

Prerequisites
To use this theme's gem, you need to first have a functioning Jekyll website. If you don't, there are many resources online for how to set up a Jekyll site. Here are the basic commands to get a minimal Jekyll site set up in Ubuntu:
$ sudo apt-get update
$ sudo apt-get install ruby ruby-dev make gcc
$ sudo gem install jekyll bundler
$ jekyll new ~/mysite
Installation
To use the Beautiful-Jekyll theme, add this line to your Jekyll site's Gemfile:
gem "beautiful-jekyll-theme", "1.1.1"
Then add this line to your Jekyll site's _config.yml:
theme: beautiful-jekyll-theme
And finally execute:
$ bundle
To preview your site, run bundle exec jekyll serve (optionally with the --host 0.0.0.0 flag if needed) and open your browser at http://localhost:4000.
Usage
Using Beautiful-Jekyll is very simple, but you should take a few minutes to read through the features it supports to learn how to use it.
Adding content
You can now start adding pages to your site. Beautiful-Jekyll supports three layouts: post, page, and minimal. In order to use Beautiful-Jekyll's template, a page must have its layout parameter set to one of these options in the YAML.
Any blog posts (pages under the _posts directory) should use the post layout, while most other pages should use the page layout. You can use the minimal layout if you want a page with minimal styling, without the bulky navigation bar and footer.
Instead of remembering to manually add the layout parameter to every page's YAML, I recommend you add the following lines to your _config.yml so that all blog posts will automatically have layout post and all other pages will have layout page:
defaults:
  -
    scope:
      path: ""
      type: "posts"
    values:
      layout: "post"
  -
    scope:
      path: ""
    values:
      layout: "page"
Adding an index page
Feel free to create the index page (homepage) of your site however you'd like. If you want to have an index page similar to the one at deanattali.com, then create index.html as follows:
---
layout: page
title: My Website
subtitle: Some short description of my site
---
<div class="posts-list">
{% for post in paginator.posts %}
<article class="post-preview">
<a href="{{ post.url }}">
<h2 class="post-title">{{ post.title }}</h2>
{% if post.subtitle %}
<h3 class="post-subtitle">{{ post.subtitle }}</h3>
{% endif %}
</a>
<p class="post-meta">
Posted on {{ post.date | date: "%B %-d, %Y" }}
</p>
<div class="post-entry">
{{ post.excerpt | strip_html | xml_escape | truncatewords: 50 }}
{% assign excerpt_word_count = post.excerpt | number_of_words %}
{% if post.content != post.excerpt or excerpt_word_count > 50 %}
<a href="{{ post.url }}" class="post-read-more">[Read More]</a>
{% endif %}
</div>
{% if post.tags.size > 0 %}
<div class="blog-tags">
Tags:
{{ post.tags | join: ", " }}
</div>
{% endif %}
</article>
{% endfor %}
</div>
{% if paginator.total_pages > 1 %}
<ul class="pager main-pager">
{% if paginator.previous_page %}
<li class="previous">
<a href="{{ paginator.previous_page_path | replace: '//', '/' }}">← Newer Posts</a>
</li>
{% endif %}
{% if paginator.next_page %}
<li class="next">
<a href="{{ paginator.next_page_path | replace: '//', '/' }}">Older Posts →</a>
</li>
{% endif %}
</ul>
{% endif %}
You'll also need to add these lines to your _config.yml because the code above uses pagination:
paginate: 5
gems:
  - jekyll-paginate
Make sure there is no index.md file (if there is one, then delete it).
Creating a navigation bar
Add these lines to your _config.yml file to get a demo navigation bar:
navbar-links:
  Home: ""
  About Me: "aboutme"
  Resources:
    - Beautiful Jekyll: "http://deanattali.com/beautiful-jekyll/"
    - Learn markdown: "http://www.markdowntutorial.com/"
    - GitHub Pages: "https://pages.github.com/"
  Author's home: "http://deanattali.com"
Change these values to match the pages on your site. Each menu item is composed of a key:value pair, where the key is the text that shows up in the navigation bar, and value is the URL to link to. The URL can either be the name of a page on your site (eg. "" will go to your homepage, aboutme will go to a page called aboutme on your site), or a URL to an external site beginning in http. If you want to define sub-menus, use the format that the Resources menu is using in the sample code above.
Displaying an image in the navigation bar
You can add an image to the middle of the navigation bar by defining the avatar parameter in _config.yml. The image should be a square (width = height). This image will disappear once the user scrolls down in the page.
avatar: "/path/to/image.png"
You can also place an image in the top-left corner of the navigation bar instead of your website's title. This is done with the title-img parameter in _config.yml:
title-img: "/path/to/image.png"
Add your name/email/social media links to the footer
You can add contact information and social media links in the footer. They will be displayed as nice little logos, to give the footer a clean feel. Add the following to your _config.yml file:
author:
  name: Some Person
  email: "youremail@domain.com"
  facebook: yourname  # eg. daattali
  github: yourname    # eg. daattali
  twitter: yourname   # eg. daattali
  telephone: yourphone     # eg. +14159998888
  reddit: yourname    # eg. daattali
  google-plus: +yourname   # eg. +DeanAttali or 109424658772469020925
  linkedin: yourname  # eg. daattali
  xing: yourname      # eg. daattali
  stackoverflow: yourlink  # eg. "3943160/daattali"
  snapchat: yourname  # eg. daattali
  instagram: yourname # eg. daattali
  youtube: yourlink   # eg. user/daattali or channel/daattali
  spotify: yourname   # eg. daattali
Remove the lines that you don't want to display in the footer, and change yourname to the correct values in the links you want to keep.
Add an RSS feed link to the footer
You can add an icon that will link to an RSS feed of your blog by including the following parameter in _config.yml:
rss-footer: true
Add your website's name to the footer
After all the contact info links, you can also add the name of your website by defining the url-pretty parameter in _config.yml:
url-pretty: "MyWebsite.com"
Buttons for sharing blog posts on social media
By default, every blog post will have buttons at the bottom for sharing the page on Twitter, Facebook, LinkedIn, and Google+. If you want to disable these buttons, add these lines to your _config.yml:
share-links-active:
  twitter: false
  facebook: false
  google: false
  linkedin: false
These settings will remove all four buttons. You can use true instead of false for any buttons that you want to keep.
Allowing users to leave comments
If you want to enable comments on your site, Beautiful-Jekyll supports the Disqus comments plugin. To use it, simply sign up to Disqus and add your Disqus shortname (not the userid) to the disqus parameter in _config.yml:
disqus: yourshortname
Adding Google Analytics to track page views
Beautiful-Jekyll lets you easily add Google Analytics to all your pages. This will allow you to track all sorts of information about visits to your website, such as how many times each page is viewed and where (geographically) your users come from. To add Google Analytics, simply sign up to Google Analytics to obtain your Google Tracking ID, and add this tracking ID to the google_analytics parameter in _config.yml:
google_analytics: yourid
YAML parameter you can use to personalize each page
These are all the parameters you can place inside a page's YAML front matter that Beautiful-Jekyll supports.
| Parameter | Description |
|---|---|
| layout | What type of page this is (default is blog for blog posts and page for other pages. You can use minimal if you don't want a header and footer). |
| title | Page or blog post title. |
| subtitle | Short description of page or blog post that goes under the title. |
| bigimg | Include a large full-width image at the top of the page. You can either give the path to a single image, or provide a list of images to cycle through (see my personal website as an example). |
| comments | Only applicable if the disqus parameter is set in the _config.yml file. All blog posts automatically have comments enabled. To enable comments on a specific page, use comments: true; to turn comments off for a specific blog post, use comments: false. |
| social-share | If you don't want to show buttons to share a blog post on social media, use social-share: false (this feature is turned on by default). |
| share-img | If you want to specify an image to use when sharing the page on Facebook or Twitter, then provide the image's full URL here. |
| image | If you want to add a personalized image to your blog post that will show up next to the post's excerpt and on the post itself, use image: /path/to/img.png. |
| js | List of local JavaScript files to include in the page (eg. /js/mypage.js) |
| ext-js | List of external JavaScript files to include in the page (eg. //cdnjs.cloudflare.com/ajax/libs/underscore.js/1.8.2/underscore-min.js) |
| css | List of local CSS files to include in the page |
| ex-css | List of external CSS files to include in the page |
| googlefonts | List of Google fonts to include in the page (eg. ["Monoton", "Lobster"]) |
Contributions
If you find anything wrong or would like to contribute in any way, feel free to submit a pull request/open an issue on GitHub, or send me a message.
Thank you to all contributors. Special thanks to the following people with non-trivial contributions (in chronological order): @hristoyankov, @jamesonzimmer, @XNerv, @epwalsh, @rtlee9.
Credits
This template was not made entirely from scratch. I would like to give special thanks to:
- Barry Clark and his project Jekyll Now, from whom I've taken several ideas and code snippets, as well as some documenation tips.
- Iron Summit Media and their project Bootstrap Clean Blog, from which I've used some design ideas and some of the templating code for posts and pagination.
I'd also like to thank Dr. Jekyll's Themes, Jekyll Themes, and another Jekyll Themes for featuring Beautiful Jekyll in their Jekyll theme directories.